Episode 11: Semi-Automated Development with AI Agents

As part of a health digital transformation initiative, I am developing a smartphone app that exports data from Google Health Connect to Google Sheets. As shown in the figure below, I ask ChatGPT to generate the source code, paste it into Android Studio, and then build and debug the app. If an error occurs during the build, I relay the error to ChatGPT and ask for suggestions on how to fix it. In this way, I am driving development by moving back and forth between generative AI (ChatGPT) and the IDE (Android Studio), with the developer at the center of the process.

Challenges in Development Using Generative AI (Conversational)

Generative AI (ChatGPT) has made programming much easier by providing support through repeated interactions, such as suggesting code snippets. For this smartphone app project, I’m using Kotlin, a Java-based programming language, which is a first for me. Even so, with ChatGPT’s support, I’ve been able to build the project, add code line by line, and gradually improve functionality through testing.

However, there is one challenge: the sheer volume of back-and-forth communication. When I need to figure something out, I go back and forth with ChatGPT. Once I have a concrete piece of source code, I build it using the IDE (Android Studio). If a build error occurs, I check with ChatGPT and get an improved version of the source code. I then repeat the process of building in the IDE. If the build passes, I test it on a physical device. Depending on the test results, I go back and forth with ChatGPT again, endlessly repeating the cycle of corrections and improvements. During this time, I have ChatGPT manage my backlog so I don’t lose track of the situation.

ChatGPT is extremely helpful, but combined with my own lack of expertise, the number of interactions has become quite high. I wish I could delegate a bit more to it.

Utilizing AI Agents

Recently, there has been a lot of buzz around development using AI agents. You can tell the AI agent what you want to achieve in your development, and it will write the source code on your behalf, attempt to resolve any issues on its own, and even run tests and builds. Since we are using ChatGPT for this project, we will be using CODEX. While coding assistants like GitHub Copilot and Claude Code have recently emerged, we decided to start with CODEX, which is available within the scope of our ChatGPT subscription.

The relationships are as follows. Think of CODEX as acting as an intermediary between the developer and Android Studio. Since CODEX is actually run in the terminal within Android Studio, the diagram might look a bit odd.

Changes in the Relationship with Generative AI

The expected role of generative AI changes before and after the adoption of CODEX. This is summarized in the table below.

PhaseChatGPT onlyChatGPT and CODEX
Review of Programming ContentDiscuss via conversation with ChatGPTSame as above. Additionally, please create a prompt for submitting a request to CODEX.
Creating and modifying source codePaste the code generated through a conversation with ChatGPT into Android Studio. Occasionally, the code may be incorrect; in that case, paste the current code into ChatGPT and ask it to suggest revisions.We will review the development plan and workflow in CODEX. After that, we will review the source code modifications. They will review the code while looking at the actual source. We will then confirm with the developers whether the proposed changes are appropriate.
*Note: We may also detect other issues during this process.
Building and Troubleshooting Build ErrorsInstruct the IDE to build the project. If an error message appears, paste the error message into ChatGPT to get a suggested fix, then modify the source code as described above.CODEX can detect errors, automatically correct them, and rebuild the code, thereby driving autonomous improvements. Depending on the nature of the issue, it may ask the developer for approval to proceed.
TestDevelopers either write test code or perform tests by interacting with the user interface. If issues arise during testing, they continue to work with ChatGPT to make the necessary fixes.You can specify the test criteria and experiment with different parameter combinations. Once sufficient verification has been completed, the developers will perform the tests.

We use conversational generative AI to complement developers’ capabilities. We use it to brainstorm development and modification ideas through conversation, or to have it generate source code. However, the actual development is performed by the developer using an IDE. On rare occasions, the source code in the IDE may not match the code returned by ChatGPT; in such cases, we may provide the IDE source code to ChatGPT to prompt it to reconsider. Essentially, we use it to assist the developer’s work.

On the other hand, when using the AI agent (CODEX), developers no longer need to write the source code themselves. They can still use the IDE to handle fine-tuning and other developer-specific adjustments as before. Essentially, developers describe what they want to achieve in text, and CODEX processes the information to determine how to modify existing code or add new classes, then presents an implementation proposal. CODEX will consult with the developer when judgment is required, such as when it has received development content and a concrete development plan is ready. The developer then decides whether to proceed, make further adjustments, or stop.

Although I’ve described it as a developer and an agent, when using the agent, CODEX effectively becomes the developer, while the human developer manages the development by monitoring CODEX’s actions and responding to its inquiries. It feels like the roles have shifted slightly.

Actually developing with an agent

As we continued to make changes to the smartphone app, the codebase grew in size, and the amount of work involved in copying and pasting code generated by ChatGPT into the IDE also increased. Consequently, we decided to switch to agent-based development. We implemented the following actual development tasks:

  • Revision of Sleep Duration Calculation Method (in Origin Units)
  • Revision to make screen scroll controls and manually entered values easier to understand

As we moved forward with these initiatives, we encountered some challenges. The challenges and our responses are outlined below.

Issue 1: I can’t write instructions for CODEX.

I’ve had to figure out how to pass tasks that I previously solved through conversations with ChatGPT to CODEX with a single instruction, and I’ve been struggling with how detailed those instructions should be. I resolved this by having ChatGPT write the instruction prompts for CODEX, but I’m still working out the details. To avoid having to write out every instruction from scratch each time, I’ve been documenting the app in README.md and outlining the program’s structure in Project_map.md—and I’ve had ChatGPT generate all of these as well. By placing these files in the project folder within the IDE, I can ensure that all the essential information is conveyed without omission. I continue to rely on ChatGPT for support regarding this approach to using CODEX.

Issue 2: I relied too heavily on CODEX, which caused it to malfunction.

When I instructed the team to review the method for tracking sleep duration, an issue arose where a feature that had previously been working properly stopped functioning. Specifically, when the permission to access HealthConnect data on a smartphone was not granted, the system used to display a permission settings screen and prompt the user to grant access; however, for some reason, it had started automatically displaying an error message instead.

In cases like this where the issue is clearly identifiable, I can specifically inform CODEX that the previous functionality has been disrupted by this fix and instruct them to restore the original behavior. Additionally, to prevent such mistakes from occurring in the first place, we will add instructions to keep fixes to the absolute minimum and avoid making changes to unrelated source code. Since this issue was noticed during the review of the fix, it serves as a reminder that simply approving changes without thoroughly reviewing them can lead to such problems. Therefore, it is essential to carefully scrutinize the details and determine whether to proceed with the work.

Issue 3: Ensuring a Smooth Development Process.

This is about using Git properly. Not limited to agent development, we should establish recovery points so that if a problem like the one described in Issue 2 above arises and it becomes difficult to continue modifying the source code, we can revert to an appropriate checkpoint.

To achieve this, we should establish checkpoints before proceeding with CODEX and modifications. By properly managing Git—such as committing only after development and testing are complete and no issues are found—we can ensure that agents can develop the source code with peace of mind. Personally, since I tend to forget how to use Git, I’m considering incorporating instructions for Git directly into CODEX.

Finally

Before we started, I thought switching to an agent-based development approach would be quite challenging, but the environment was well-prepared, and with the support of ChatGPT, we were able to make relatively smooth progress. Going forward, I’d like to gradually tackle more complex modifications and become more comfortable with this agent-based development approach.

Posted in Story | Tagged , , , , , | Leave a comment

Episode 10: Updating the Google HealthConnect-Integrated Smartphone App

A recap of the previous session

Last time, I created a new smartphone app, set up a data flow to retrieve information from Google HealthConnect, and wrote it to a Google Spreadsheet via Google Apps Script. This is the red route shown below.

However, the data currently available is shown in the table below; the step count is significantly higher than the actual number, and other fields are left blank. This is likely because the collected data was skewed toward “steps” or included extra numbers.

Improvements to Health DX Tools

In this update, we will resolve the aforementioned issues and ensure that step count, weight, body fat percentage, and sleep duration are correctly collected from HealthConnect and recorded in the spreadsheet. We will also implement the following improvements:

  • Identifying and Resolving Issues with Measurement Data
  • UI Development

Ultimately, as shown in the figure below, I had been manually entering data into the two apps on the left (Appsheet and Google Fit)—specifically, I had been manually entering every single field in Appsheet. I also entered my weight and body fat percentage separately into Google Fit and Fitbit, using each app for its respective purpose. To address this, I aim to streamline the process by consolidating data retrieval from HealthConnect and inputting it directly within the app, thereby reducing the burden of data entry.

Step 1: Identifying the Cause of the Problem

Problem: I was aggregating data from multiple data sources (Origins).

The issue with the previous data—where the step count exceeded my actual experience—was that it had combined data from multiple sources (Origins).

In my setup, step counts are tracked by both my smartwatch (Fitbit) and my smartphone, and in this case, the data is recorded on HealthConnect separately by source (Origin). The previous result was inflated compared to reality because it had summed the data from multiple sources (Origins).

When I connected my smartphone to Android Studio and used the debugging feature, I discovered that there are three types of data sources (Origins): Fitbit, android.apps.fitness, and android. I assume that the two starting with “android” both represent the same value and correspond to HealthConnect and the Android OS, respectively.

If you have smartwatches, pedometers, or other devices with write permissions for HealthConnect, the number of data sources (Origins) increases, so you’ll need to select one as needed. In this case, I’d like to use Fitbit as the priority device, but there was another issue. Please take a look at the data from a different day below.

The Fitbit reading for this day looks quite low, but that’s actually because there were times when my smartwatch ran out of battery and couldn’t track my activity. Since my device needs to be charged every few days, if I forget to charge it, the battery dies during the day and it stops tracking. Also, since I leave it on the charger while it’s charging, it’s unable to track during that time as well. During those periods, I tend to rely on the step count from my smartphone instead.

However, even these 6,108 steps feel significantly lower than I actually felt. In fact, when I walk or run on a treadmill, I tend to set my smartphone aside, so some steps may not be counted—that’s another issue I need to address.

Solution: Set the priority for Origin and provide a manual adjustment screen.

We will address these issues in accordance with the following specifications.

  • (Specification 1) Generally, among multiple Origins, the Origin with the highest daily value is selected.
  • (Specification 2) This app also allows direct data entry into HealthConnect to add data to a new Origin. *This is intended to correct data when the data from any of the Origins appears abnormal.

As for other issues, we will first clarify the specifications and proceed with development by adding them to the backlog to ensure nothing is overlooked.

Tips: Have ChatGPT manage your chat history

I use ChatGPT to manage the backlog of tasks that need to be addressed. In my case, I use prompts like the one below to manage the backlog and check on its status.

Add to Backlog

Please manage this item as a backlog.
・Among multiple Origins, select the Origin that recorded the highest daily value.
・Enable direct data entry into HealthConnect within this app and add data to a new Origin.

Check the backlog status

Please provide a breakdown of the current backlog by status.

Consider the next steps

Which task should I tackle next?

The prompt I’m still using is designed to sound like a simple conversation, but it’s generally performing as expected.

Step 2: How to Import Values

In the first stage, we confirmed that there is a value for “Steps” for each Origin, so we will review the values for the other items and consider how to import them.

Problem: Characteristics by Category and Issues to Be Addressed

ItemOriginSession TrackingIssue
StepsFitbit, DeviceYesMultiple sources, manual entry
Sleep timesFitbitYesDaily boundaries, multiple sessions
WeightGoogle Fit (manual entry)NoManual entry
Body Fat%Google Fit (manual entry)NoManual entry, decimal input

As with the step count mentioned earlier, when reviewing the debug logs, I noticed the characteristics described above, and it was particularly necessary to address the “session status” and the issues outlined in the assignment. Below are some additional notes regarding the assignment.

  • Session Status: Step count and sleep duration are recorded not only as values but also with start and end times (e.g., 07:00–09:00); these are referred to as sessions. Throughout the day, there are frequent breaks—such as walking, resting, sleeping, waking up (e.g., to use the restroom), or taking a nap. You need to combine the values from multiple sessions. Weight and body fat can be recorded multiple times a day by specifying the date and time, but for the purpose of compiling daily results, it is simple because you only need to collect the latest values.
  • Multiple Origins: Since values are recorded for each data source (Origin) mentioned in the section on step count above, you need to select which values to use.
  • Manual Entry: In my setup, I need a way to manually enter weight and body fat percentage—which aren’t recorded automatically—as well as steps and sleep duration, since these can’t be recorded when the battery is dead or the device is charging.
  • Daily Boundaries: Where should sleep duration be divided? For example, how should we handle a scenario where someone goes to bed at 10:00 PM and wakes up at 6:00 AM? Should we count it as 8 hours of sleep for the previous day, or split it at midnight to record 2 hours and 6 hours on separate days?
  • Decimal Input: While weight and body fat percentage can be manually entered in Google Fit and recorded in HealthConnect, body fat percentage can only be entered as an integer (e.g., 22%). Since I wanted to enter values with decimals (e.g., 21.8%), I need a way to input them.

Solution: Consider how to import the data based on the characteristics of each value

We have also included specifications 1 and 2 mentioned earlier.

  • (Specification 1) Generally, among multiple Origins, the Origin with the highest daily value is selected.
  • (Specification 2) This app also allows direct data entry into HealthConnect, adding data to a new Origin.
  • (Specification 3) Step count and sleep data are summed across multiple sessions.
  • (Specification 4) Sleep duration is calculated by setting a cutoff time to aggregate values from the previous day. Example: 6:00 cutoff, etc.
  • (Specification 5) When entering data manually, allow the input of body fat percentage values that include decimals.
  • (Specification 6) To prioritize manually entered values, review the priority of Origins.
  • (Specification 7) When entering sleep and step counts, do not create session information or upload data to HealthConnect; instead, manage the data as temporary data on the device.

Regarding Specification 7, since creating session-based data would be too complex, and since we only need to know how many steps were taken and how many hours of sleep were recorded each day, we have decided not to create session data.

The actual development process involved reviewing debug logs in Android Studio to understand the specifications, generating source code using ChatGPT, modifying the source code in Android Studio, rebuilding the app, connecting it to a smartphone, and debugging—repeating this cycle to gradually improve the code. Eventually, I managed to get it to the point where values are recorded in a spreadsheet, as shown below.

I found that the approach of managing the backlog with ChatGPT and building it incrementally helped me understand the current state of affairs and clarify what needed to be done, making the process much smoother. However, I’ve noticed that as the volume of information increases—such as pasting source code or logs into the conversation or having ChatGPT generate code—the dialogue becomes increasingly sluggish, which is a challenge. I’d like to try using modern AI agents in the future to see if there’s a more efficient way to handle this.

Step 3: UI and GAS Development

The user interface (UI) was developed primarily with the following features. It is the result of continuous improvements made by adding necessary features as needed, starting with a version created for functional testing.

ScreenFeatures
Initial ScreenGAS Communication Settings and Operation Check
Main ScreenDaily main screen, synchronization feature, access to input and settings
Input ScreenFunction for entering weight, body fat percentage, step count, and sleep duration as needed
Setting ScreenGAS communication settings, sleep duration cutoff times, etc.

The main screen currently looks like this. Immediately after launching, settings for reading and writing data on HealthConnect appear, followed by the initial screen where you configure the items required for GAS communication. These items are as follows:

・GAS URL
・Secret (Password)
・Spreadsheet ID
・Sheet Name

A corresponding GAS script is also generated, and you configure the settings within GAS. If the connection test is successful, the main screen on the right will appear, displaying data based on the selected display period (3, 7, or 14 days).

Clicking the “Correct” button opens an input screen for four fields, where you can select a date and time and enter values only for the necessary fields. Manually entered values are marked with an underline and an asterisk (*) to indicate that they are corrected values.

Since I enter my weight and body fat percentage every day, all of these values are adjusted figures. As for the step count on March 12, my Fitbit ran out of battery, and since I had left my phone behind, I’ve entered an approximate value.

Finally

Using the smartphone app I developed, Hc2Spread (HealthConnect to Spreadsheet), I retrieve step counts and sleep duration data from Fitbit and Google Fit. For weight and body fat percentage data, which aren’t imported automatically, I can now enter them into HealthConnect directly from this app. If the values are incorrect, I can now edit them in the app and update the data in the spreadsheet via Google Apps Script (GAS).

Ideally, I would have liked to eliminate the app on Appsheet, but since it excels at visualizing data through graphs, I’ve decided to keep using it while reducing the number of input fields. It’s hard to say for sure whether this constitutes an improvement, but I’m quite satisfied that I’ve been able to use generative AI to connect to HealthConnect and store the data in a spreadsheet for easier use.

Going forward, I’d like to explore “automation” and other approaches to further enhance the effectiveness of this system.

Posted in Story | Tagged , , , , , | Leave a comment

Episode 9: Challenges and Solutions for Auto-Fill with Google Health Connect Integration

Health DX Progress Confirmation

This time, we will again identify the progress and challenges of Health DX tool users. Approximately one month has passed since the last session.

  • Weight: Continuing to decrease at a pace of 1kg per month. Progress is relatively steady.
  • Body Fat Percentage: The body composition monitor was switched midway, causing the readings to change.
  • Steps: Around 8,000 steps, with more days falling slightly below that.
  • Sleep: Continually getting less than 5 hours most nights, which is on the low side.

Last time, target values were set for each graph, and a moving average was added to the weight graph. This makes the targets easier to understand as benchmarks, and the moving average is also helping shift my mindset away from getting overly excited or disappointed by daily fluctuations.

Advantages and Challenges as a Health DX Tool

I will summarize the strengths and challenges based on my actual experience, including what was implemented in the previous initiative.

  • Positive Points
    • The improved usability of entering meals via buttons reduces the burden of daily input.
    • The target values on each graph provide clear daily benchmarks.
    • The addition of a weighted average for weight makes it easier to avoid getting overly excited or disappointed by daily fluctuations.
  • Challenges
    • Re-entering values already available on the smartphone (such as step count) is burdensome.

This time, I’ll continue making improvements in consultation with my trainer, but I’ll omit diet advice from Health DX. This is because progress has been relatively stable, and my trainer recommends continuing as is. This time, I’ll primarily focus on improving the tools.

Improving Health DX Tools

This time, we’ll consider improvements to “re-entering values already present on the smartphone.” For example, step counts and sleep duration are obtained by smartwatches or the smartphone itself, and on Android smartphones, they are accumulated in Google Health Connect. The functional structure is shown in the diagram.

I check the values in the Fitbit or Google Fit app, transcribe them into Appsheet, and ultimately record them in Google Spreadsheet via Appsheet. I want to reduce this transcription work. Specifically, I plan to develop a new app on my smartphone, as shown in the diagram below. This app will retrieve data from Health Connect and register the values in Spreadsheet via Google Apps Script.

This countermeasure involves establishing this countermeasure route. However, establishing this route presented significant challenges this time, so we have summarized the issues and countermeasures we encountered while leveraging generative AI to drive improvements.

The First Wall: Understanding build and dependency structures

This time, it was my first time developing an Android app (using Android Studio), my first time using Kotlin, and my first time using Gradle—a whole lot of firsts. While I’m using ChatGPT to help with the development, my lack of foundational knowledge was so severe that it took a considerable amount of time just to get the build working. I incorporated the generated source code and dependencies for accessing Health Connect into the simplest possible screen app in Android Studio, but I got stuck because it wouldn’t compile. The main issues were as follows:

  • Specifying SDK versions (compileSdk, targetSdk, minsdk)
  • Minimizing dependencies
  • Unsynchronized state due to not performing Gradle Sync

1.Specifying SDK Versions (compileSdk, targetSdk, minsdk)

The main source is MainActivity.kt, dependencies are specified in build.gradle.kts, and we build using Android Studio. We pass build errors to ChatGPT and iterate on improvements. The above two issues were resolved by specifying three SDK versions.

  • compilesdk = 36 # SDK version used during compilation
  • targetsdk = 34 # SDK version at runtime; slightly lower than compilesdk to resolve build errors
  • minsdk = 26 # Minimum guaranteed SDK version; specifies a version where Health Connect is available

Specifying the exact version was crucial. However, I didn’t thoroughly investigate the rationale behind each value. I had ChatGPT figure it out, and since the build wouldn’t pass, I ended up lowering the target SDK.

2.Streamline dependencies to the minimal configuration

This is also part of my trial and error with ChatGPT. It seems there was a conflict within the implementation that was included in the initially generated source code. When I tried passing the source to a different chat again, the results were narrowed down to the following two:

    implementation("androidx.health.connect:connect-client:1.1.0")
    implementation("com.squareup.okhttp3:okhttp:4.12.0")

The first line is the Health Connect library, and the second line is the library used to call Google Apps Script (GAS).

3.Unsynchronized State Due to Not Performing Gradle Sync

I hadn’t realized this due to my inexperience, but I assumed that updating the Gradle definitions would automatically keep dependencies up to date and load the necessary libraries. However, the “Gradle sync” operation was required.

In Android Studio, you can perform “Gradle sync” using the following screen operations:

  • Click the elephant icon labeled “Sync Project with Gradle Files” in the upper-right corner of the screen
  • or press “CTRL + SHIFT + O”

The Second Wall: Lack of Understanding of the Execution Environment and Permissions Model

This was partly due to my inexperience and reliance on generative AI, which led to gaps in my knowledge. The code generated by the AI didn’t run as-is; I had to modify it to resolve issues before it worked. I thought I understood this, but I still struggled quite a bit.

Specifically, when determining if Health Connect was active, I failed to notice that the meaning of the numbers differed depending on the SDK version. For a while, I mistakenly believed Health Connect wasn’t usable. Ultimately, the Health Connect check was implemented as follows:

val status = HealthConnectClient.getSdkStatus(this, HC_PROVIDER)
val statusLabel = when (status) {
    HealthConnectClient.SDK_AVAILABLE -> "SDK_AVAILABLE"
    HealthConnectClient.SDK_UNAVAILABLE -> "SDK_UNAVAILABLE"
    HealthConnectClient.SDK_UNAVAILABLE_PROVIDER_UPDATE_REQUIRED -> "SDK_UNAVAILABLE_PROVIDER_UPDATE_REQUIRED"
    else -> "UNKNOWN($status)"
}
Log.d("HC", "Health Connect SDK status = $statusLabel ($status)")

This confirms that Health Connect is now available, allowing us to proceed.

The Third Wall: Asynchronous Processing and Network Design

There are many things you won’t notice unless you know about them. For example, there’s a rule stating that “Communication must not be an extension of button operations.” The initial source code generated by ChatGPT also treated it as communication extending from button operations. However, the issues mentioned above were pointed out, so I checked the countermeasures with ChatGPT and made improvements.

Specifically, I implemented the following three countermeasures:

  • Change post-processing to a suspend function
  • Wrap with withContext(Dispatchers.IO)
  • Add Coroutine import

It’s easy to write about, but I couldn’t solve it myself—it wouldn’t have improved without ChatGPT. I wish it had been designed to avoid problems from the start, but I’m satisfied that it’s resolved now.

Add Google Apps Script and update the spreadsheet

I also generated the source using AI and registered it. When I pointed out that Spreadsheet didn’t recognize the processing, they added it, and it executed surprisingly smoothly. The source is simple, with only about 20 to 30 lines.

Upon execution, values were recorded in column A (date) and column B (steps). Looking at column F, you can see that it was run twice over about four days. Each time, it aggregates and records data from the past three days.

Finally

I successfully connected to Health Connect and registered the data in Google Spreadsheets, but this data is actually incorrect. The numbers are significantly larger than the actual values, and I haven’t been able to capture weight, body fat percentage, or sleep duration, so further improvements are needed. I plan to address these issues in the next opportunity.

For now, I’ll consider it a success that I managed to punch holes in the series of processes and wrap things up here.

Posted in Story | Tagged , , , , , | Leave a comment

Episode 8: Tracking Diet Goals and Meal Logs with Appsheet – Health DX –

Health DX Progress Confirmation

This is a continuation of our discussion about building our own employee health management system. It’s been about two weeks since we migrated from spreadsheets to Appsheet, and the data has continued to grow. As before, we’ll further review both the weight loss initiative as part of our health DX efforts and the underlying mechanisms.

  • Weight: Overall decreasing trend, averaging about 1kg less.
  • Body Fat Percentage: Also decreased by about 1%.
  • Steps: Averaging over 9,000 steps.
  • Sleep: Mostly under 5 hours, on the low side.

I feel like I’m starting to see some results, but I’ll continue working on the following: addressing operational challenges, reviewing the status of my health DX with my trainer, and making improvements.

Advantages and Challenges as a Health DX Tool

Here’s a summary of the pros and cons we experienced after implementing AppSheet in our previous initiative.

  • Pros
    • Input can now be done on smartphones, making it easier to enter data anywhere.
    • Visibility improved by using graphs on the dashboard.
  • Cons
    • Make it clearer by including target values to aim for.
    • Weight fluctuates a lot, so make trends easier to understand.
    • Since values are entered manually, we want to make input easier.

First, we’ll proceed by discussing the current situation with the trainer.

Current Status Review and Future Action Planning with the Trainer (ChatGPT)

We will provide the current data to the trainer to review the current figures and discuss future actions. The following are ongoing initiatives from the previous session.

Current Initiatives
  • Exercise: Walk 8,000 steps per day, morning and evening stretching, and light strength training (20 sit-ups and 10 push-ups without equipment).
  • Diet: Veggie first (salad at the start of every meal), reduce white rice only at dinner (no reduction in noodles, etc.), add protein to breakfast.

Current Situation Analysis and Countermeasures

As before, we provided the data to the trainer to confirm the current status. The trainer gave us the harsh opinion that “it’s still too early to say we’re seeing a downward trend.” However, since the numbers do show some reduction, they suggested we try the following measures.

Recommended Action Plan
  • Exercise & Diet: Maintain current habits and simply record meals to understand dietary content.
  • Sleep: Even increasing sleep by 30 minutes may significantly reverse the decline trend.

Regarding sleep, I’ll focus on effort, and for meal tracking, I’ll explore improvements within the tool itself.

Health DX Tool Improvements

We’ll address the issues mentioned at the beginning and the trainer’s feedback on meal tracking within the tool. This time, we’ll focus on the following four points:

  • Measure 1: Add Target Values: Include target values to make goals clearer.
  • Measure 2: Add Moving Averages: Weight fluctuates a lot, so moving averages will help show trends more clearly.
  • Measure 3: Improve Input Method: Currently manual entry; make input easier.
  • Measure 4: Add Meal Logging: Add a dedicated screen and data for meal records.

Measure 1: Add Target Values

While numbers are now visible on dashboards and graphs, without targets, it’s unclear how much effort is needed. We’ll set target values for each item and display them on the graphs.

1.Adding Target Values

    Add a “Target Values” sheet to the spreadsheet where data is recorded and set target values for each item.

    2.Link the data recording sheet with the target value sheet in Appsheet

    Use the Lookup function to add a virtual column and set up cross-sheet references using the Lookup function.

    Set up the target value sheet to load in Appsheet as before.

    Next, we’ll add a link between the two sheets. Since the chart references data from Sheet1, open Sheet1 and add a Virtual Column (VC) with a Lookup function for the link. First, add the VC.

    Click the Add Virtual Column button to add an item. Set the formula as follows. This Lookup function references another sheet and sets the value in this VC.

    Adding an item will place it at the bottom of the table as shown below.

    Next, configure the graph settings. Open the UX Weight section, click the Add button under Chart columns, and add the “Weight (Goal)” column you added earlier. After adding it, the display will appear as shown below. The graph colors are also set individually. The target value is uniformly displayed in red.

    Adding the target weight is now complete. Similarly, add the VC and graph for each item. Once all additions are finished, it will look like this. For the target weight, while the ultimate goal is 60kg, it feels too distant, so I’ve set the immediate target to 67kg to keep it within an achievable range. Everything else remains unchanged.

    This should make it easier to identify your target compared to just looking at actual values, right?

    Countermeasure 2: Adding a Moving Average

    The trainer said, “Since a person’s weight fluctuates by about ±0.8kg daily due to body water levels, it’s better to take a moving average over about a week to see the trend.” So, first, we’ll add a moving average to the weight section. The method for adding it is the same as above: add a VC and include the calculation formula.

    Definition of this moving average: Calculate the average of the weight data for the week including the current day (from 6 days prior to the current day), and use this as the moving average value for the current day.

    The VC settings are as follows:

    Adding this item to the UX weight will enable the moving average.

    A blue broken line has been added to the graph on the right. While the actual weight values fluctuate wildly, you can see that the moving average shows a smoother progression. It should now be easier to see that the weight has decreased slightly compared to the beginning.

    Countermeasure 3: Improve Input Methods

    Currently, input is limited to numerical fields and text notes, with text input or numerical adjustments via the plus/minus icons on the far right. We will make input methods more user-friendly by selecting them based on the data type.

    The sleep duration input method will be changed to a slider input. To display the slider, select Range and set it to a range of 3 to 10 hours in 0.2-hour increments.

    Try adjusting each setting to experiment with different options. In the next meal log section, we’ll test the button input method.

    Countermeasure 4: Adding Meal Logs

    Since meal preferences vary, please customize the following as a reference example for using the tool. The trainer mentioned “fried foods no more than twice a week,” so we’ll add a field for whether fried foods were consumed.

    Set up the management fields as follows:

    • Breakfast: Enter common breakfast items via buttons
    • Breakfast Notes: Enter other items as text
    • Add similar items for Lunch, Dinner, and Snacks
    • Fried Foods: Indicate whether fried foods were consumed that day

    First, add data columns to the spreadsheet. The newly added columns are highlighted in green for clarity. You’ll notice a column labeled S1 at the top; this is included for page control on the input screen. It might be possible to omit it, but for now, it’s included.

    Below are the methods for switching input pages, entering meal buttons, and indicating fried food presence.

    1.Switching Input Pages

    Configure page switching using the S1 item added above. Set S1 as follows: Set Type to Show and Category to Page_Header. This will display “Next” next to the Save button on the right, and the meal item added above will appear on the next page.

    When switching pages, if a message in red text appears indicating that an entry is required, uncheck the “Require?” box next to the data field in the list. Currently, it’s best to leave all boxes unchecked except for the date field.

    2.Adding Meal Input Buttons

    For example, if you regularly eat certain items every morning like eggs, bread, and milk, adding these as buttons allows you to input them all at once. Items you don’t eat daily should be listed in the text input field.

    Set the Type to EnumList, press the Add button for Values, and enter items like eggs, bread, and milk as shown in the figure below.

    Once saved, you can input items by clicking buttons as shown in the lower right screen, then add any missing items in text. If the items used change, we’ll review the button contents and customize them for easier use.

    3.Whether you ate fried food

    If you eat fried food with every meal, it’s better to add a fried food button to the top buttons. However, if you want to manage it only once a day or so, keep it as a separate item like this time. It might also be clearer for your trainer to see if they’re separated.

    Since this item asks whether you ate fried food with a Yes or No answer, it shouldn’t allow multiple selections like the top buttons. It must be one or the other.

    Simply set the Category to Yes/No. This automatically generates a button where only one option can be pressed. You can also change the button text in the settings.

    Next, add lunch, dinner, and snacks in the same way to complete this improvement.

    Finally

    This time, we’ve further reviewed visualization and input methods, making daily use easier. Comparing against target values should also boost motivation.

    However, as the trainer pointed out, it’s important not to get too caught up in daily fluctuations. It’s better to accumulate data weekly or over a period and then review it together with the trainer. Currently, we’re conducting weekly reviews.

    I’d like to continue operating in this state for a while.

    Posted in Story | Tagged , , , , , | Leave a comment

    Episode 7: Diet Progress, Switching to AppSheet – Health DX –

    About two more weeks have passed since last time, and the data has accumulated. I’d like to analyze the accumulated data and consider improvements to the current functionality.
    First, I’ll review the data.

    Overview from the Data

    • Weight: Remained mostly flat. It appeared to decrease slightly for a while but has since returned to its previous level.
    • Body Fat Percentage: Decreased by 1%
    • Steps: Maintained around 8,000 steps per day
    • Sleep Duration: No significant change

    Later, I’ll consider what to do next with this data to achieve our goals.

    Challenges as a Health DX Tool

    The biggest issue is the significant operational burden required to maintain daily records. Since the spreadsheet must be opened on a smartphone, the following advantages and disadvantages arise:

    • Advantages
      • Easy to add items and graphs (feels familiar since it works like Excel)
      • Accessible from various devices like PCs and smartphones
    • Disadvantages
      • Reaching the input screen on smartphones requires a slightly cumbersome process
      • All text input must be done manually

    We will also work on improving the tools later.

    Discussing current analysis and future weight loss plans with the trainer (ChatGPT)

    First, we will conduct a “current situation analysis” with the trainer, followed by “consideration of improvements.”

    1.Current Situation Analysis

    Provide the trainer (ChatGPT) with the data as a table and give the following prompt to ensure it correctly recognizes the data.

    I’ll attach the data recorded in the app I created for a while. Can you tell what each item represents?

    I think I could have written it a bit more specifically, but for now, I tend to convey things in a natural way. It’s just that I can’t write long, structured prompts. The trainer provided the following interpretations for each item. It seems I understood correctly.

    ※The response contains more detailed information, but this is an excerpt.

    2.Improvement Considerations

    My diet doesn’t seem to be progressing much as it is now, so I’ll ask the trainer for their thoughts.

    Regarding my weight trend, will I be able to maintain a pace that keeps me below 60kg by the end of September 2026?

    After various explanations, the conclusion is as follows: Achieving the goal is still possible if you can lose 0.98 kg per month for the remaining period.

    Various countermeasures were suggested, but the summary is to continue as is for a while longer.
    The advice was to consider increasing sleep time by even 30 minutes. For now, I’ll continue maintaining the current status.

    Currently, I’m focusing on the following points. To those who exercise regularly, this amount might seem negligible.

    • Exercise: Walk 8,000 steps per day, morning and evening stretching, and light strength training (20 sit-ups and 10 push-ups without equipment).
    • Diet: Veggie-first (salad first at every meal), reduce white rice only at dinner (no reduction in noodles, etc.), add protein to breakfast.

    Since I believe muscle mass decreases first when weight drops without much exercise, I supplement my protein intake with protein powder. I also consulted my trainer about my diet and introduced this. For now, I plan to trust my trainer and stick with this approach.

    Improving Health DX Tools

    We will maintain the previously mentioned advantages—“ease of modification (adding items/graphs)” and “operability across multiple devices”—while considering improvements to the following disadvantages.

    • Disadvantages
      • The steps to reach the input screen on a smartphone are a bit cumbersome.
      • All text input must be done manually.

    I consulted ChatGPT about this too. I had assumed we’d end up creating a smartphone app, but it recommended using Google AppSheets for no-code development. It also mentioned that using this tool would allow us to reuse the spreadsheets we’d already been accumulating, which is incredibly convenient. Even if we end up not liking it, we can easily revert back to our current workflow. This seems like a safe approach to take.

    Google AppSheet

    https://about.appsheet.com/home

    1.Getting Started with AppSheet

    Sign in to the above site to enable AppSheet. After signing in, you will see a screen like the one below.

    2.Create a data display using the currently used spreadsheet

    Select Create > App > Start with existing data in the upper-left corner of the screen, specify the spreadsheet you’ve been using, and click Submit. The following three images illustrate this process.

    Select Google Sheets.

    Select the target file and submit.

    Okay. Done. The tall vertical view on the right side of the screen shows how it will appear on a smartphone. You can also test operations on this screen. Clicking the blue + (plus) icon allows you to add data. Clicking a daily tile lets you update that day’s data in the items around the center of the screen, which correspond to the original spreadsheet columns.

    3.Add a visualization screen

    You can add visualizations like graphs from the UX menu on the left side of the screen. While I’ve combined weight, body fat percentage, step count, and sleep duration into a single line graph, various other representations are possible, as shown in the center of the screen. You can choose based on your purpose.

    4.Create a dashboard

    Similarly, you can also add dashboards from UX. This time, I added the four graphs created above to display them as a series. However, on smartphones, you’ll view them with vertical scrolling, as shown on the right in the figure.

    Switching to tablet view allows you to see everything grouped together like this diagram. Thanks to its responsive design, it works seamlessly across various devices like PCs, tablets, and smartphones.

    5.Make it available for use on iPhone and Android devices

    For everyday use, we’ll make it available as an app. Both iPhone and Android have an app called “AppSheet,” and using this app allows you to access the app created above.

    Finally

    This resolves the issues previously listed as drawbacks, making daily data entry easier and more sustainable. Consequently, we believe it will be easier to achieve improvements in employee health.

    We plan to continue using the system, resolving issues and pursuing further improvements. Moving forward, we will use the smartphone app for data entry and updates, while using PCs for regular analysis and data transfer.

    We have started using AppSheet for meal logging, so next we want to focus on refining the input screen.

    Posted in Story | Tagged , , , , , | Leave a comment

    ChatGPT 5.2 Image Recognition Capability Enhancement

    The image generation capabilities of AI models have been rapidly improving lately. I used to think that maintaining consistency within a single image was only feasible for about two characters at most, but with ChatGPT 5.2, I believe this recognition has significantly improved.

    Specifically, SCW features the following eight characters and a mascot named Squera.

    Gathering with Gemini prior to 2.5

    I want to generate this group together, but using Gemini prior to 2.5 only produced images like the one below. While the two on the right are faithful to the original art style, the others’ clothing and accessories are only vaguely similar, and their faces and hairstyles weren’t reproduced.

    After experimenting with Gemini and ChatGPT, I found it easier to maintain consistency with up to two characters. Though I might have improved results by refining my prompt writing.

    ChatGPT 5.2 maintains consistency quite well.

    Before ChatGPT 5.2 came out, Nano Banana had already become capable of generating images with fairly consistent results, but ChatGPT 5.2 arrived and it feels like it improved significantly all at once. Here is the group image generated with ChatGPT 5.2.

    The original artwork is quite faithful to the source material. While the character on the right, Mr. Shiraishi, is supposed to be more masculine and taller, he’s drawn looking younger here.
    Since I didn’t input height settings, the unevenness is unavoidable, but I was surprised this came out in one go. However, I tried to revise Mr. Shiraishi afterward but couldn’t make the corrections.

    I realized it can maintain a high level of consistency, and I want to utilize it more going forward.

    In 2026, I’ll keep up with the amazing evolution of generative AI while being amazed by it.

    Posted in AI | Tagged , , | Leave a comment

    Episode 6: Prioritizing Employee Well-being – Health DX –

    ―― What we needed to fix first wasn’t the system, but ourselves.

    At SCW, we’ve continuously worked on improving operations and optimizing processes.
    Streamlining project management, enhancing information sharing efficiency, revising development workflows.

    Yet, a nagging feeling lingered.

    Despite these improvements, the team’s fatigue wouldn’t lift. In fact, they seemed increasingly overwhelmed.
    Regular duties were already demanding, and concurrently exploring internal DX initiatives seemed to be adding to the burden.

    Is this it!? Is this what they call DX fatigue!?

    Regardless of the exact definition, if employees aren’t physically and mentally healthy, they simply can’t do good work.

    I suspect this challenge—balancing the demands of daily work with maintaining physical and mental health—is something companies across industries grapple with daily, alongside concepts like Work-Life Balance and Well-being.

    Let’s aim for personalized health improvement – Health DX –

    Compared to the past, the working conditions for IT engineers have undoubtedly improved.
    Remote work and flexible schedules have become commonplace.

    Even so,
    we remain inseparable from irregular hours, tight deadlines, unexpected issues, and mental pressure.
    I’ve come to see this not as a lack of individual effort, but as a structural challenge inherent to the profession itself.

    This is where I shifted my perspective.

    Until now, DX has focused on tasks, systems, and processes.
    But it’s people who use and sustain these systems.

    “If people aren’t in optimal condition, no system can function effectively long-term.”

    This realization led us to conclude:
    Shouldn’t our own health and well-being also be treated as a target for DX?

    We named this initiative:
    Health DX.

    Let’s get crafty and design our own tools

    Of course, countless health management tools exist in the world.
    High-functionality apps and specialized services abound.

    But our goal this time wasn’t to adopt any of those.

    We prioritized things we could understand ourselves

    Things we could adjust to fit our work styles

    Things we could nurture and improve over time

    Above all, we valued being able to start immediately.

    Perfect design can wait.
    First, speed is key—let’s get it moving.

    Naturally, today’s era of generative AI makes it seem like anything is possible.
    This time too, we want to leverage current generative AI to devise a sustainable method with minimal burden.

    Initial Goal: Start daily logging.

    You often hear things like, “Once you start weighing yourself every day, you lose weight.”
    I believe that by keeping records, your awareness shifts, leading to conscious and unconscious improvements.

    Also, since I want to have generative AI analyze this data, I’d like to leave some diary-like notes of my observations.

    The items to log are flexible, but I’ve decided to set up something simple like this:

    • Weight
    • Body Fat Percentage
    • Steps Taken
    • Sleep Duration
    • Brief Health Notes

    I want to start by recording these daily.

    Honestly, any tool will do. I can get the numbers by combining a wristwatch-type device with a body composition scale, so I could just use those. Alternatively, I could simply record them in a table like the one below.

    First Tool: Google Spreadsheet

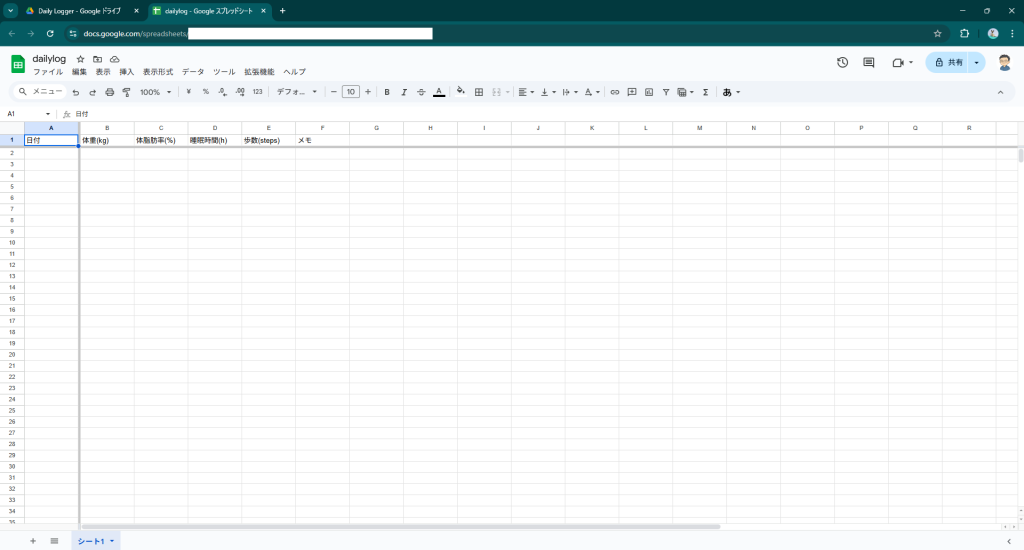
    Simply create a table in Google Spreadsheet and start logging entries. Since you can use not only PCs but also smartphones and tablets for logging, the emphasis is on being able to update from anywhere. The procedure is relatively straightforward, involving just creating a file.

    Create a spreadsheet in any location on Google Drive.
    Example: /scw/DailyLogger/dailylog

    Create five columns in the spreadsheet (anything except date is fine for this example)
    Date, Weight (kg), Body Fat Percentage (%), Sleep Duration (h), Steps, Notes

    Once the file is created, all that’s left is to keep recording daily.

    Establishing a Trainer Role as a Consultation Partner

    Managing your health and diet alone can be challenging, especially in terms of maintaining motivation. Therefore, we will establish a trainer role to serve as a consultation partner. I’m currently testing this with ChatGPT, but other generative AI tools or real trainers—such as those at a gym or a doctor—would also be suitable. I plan to consult them once I have gathered more data. Considering detailed consultations, using generative AI to get a feel for the process before consulting a professional expert is also a good approach.

    Consult with the trainer on points like the following to build a clearer vision for your future lifestyle.

    Set future goals. Example: Lose 10kg in one year, achieve a BMI below 15, etc.

    Discuss how to proceed with your future lifestyle. Example: Sleep, exercise, dietary improvements, etc.

    Start tracking: Record data for one week, then consult the trainer weekly.

    For instance, weight can fluctuate by about ±0.8kg daily due to timing of measurement and body water levels. Focusing too much on daily changes can lead to worry when there’s a slight increase. I think it’s better to record data calmly and review it weekly.

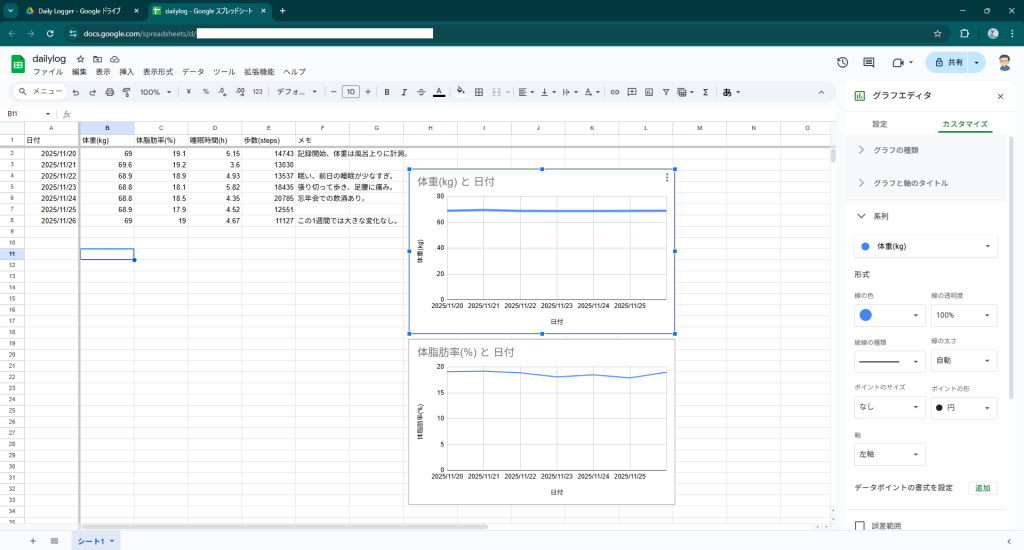
    Once enough data is accumulated, I’ll visualize it with graphs to assess progress.

    例えば、1週間記録を続けた例です。この週は始めたばかりで大きな変更はありませんでした。
    The trainer will provide this data in Excel or CSV format and discuss the next steps.

    Example: When discussing this week’s progress toward the goal of losing 10kg in about a year, we roughly reached the following conclusions:

    • It’s too early to draw conclusions after just a week or so; we should continue.
    • Since sleep is insufficient, increase sleep time by at least 30 minutes per day.
    • Walking too much isn’t ideal either, so around 8,000 steps per day is sufficient.

    Incorporate vegetables into meals. Specifically, avoid relying solely on cup noodles and eat salad first. Etc.

    While there are various other suggestions regarding exercise, it’s impossible to implement everything simultaneously. Therefore, decide what to focus on for the following week and record it in the above spreadsheet.

    I’ll keep at it.

    First, I’ll prioritize speed, start by tracking and visualizing my progress, and set up someone to consult with.
    I’ll review this weekly while considering improvements to the tools and how I operate.
    Since pushing too hard can become burdensome and make it hard to keep going, feel free to consult your trainer about the operational aspects as well.

    Posted in Story | Tagged , , , , , , | Leave a comment

    Episode 5: Reconnecting — Redesigning Email and Chat Communication

    Morning sunlight streamed through the office windows.
    The quiet hum of keyboards was broken only by the constant ping of notifications —
    Outlook, Gmail, Teams, Slack.
    Each screen flashed messages demanding attention, filling the room with invisible pressure.

    Shiraishi sighed as she scrolled through her inbox.
    “I feel like half my day disappears just replying to emails…”

    Mizuno, sitting beside her, gave a tired smile.
    “And I can’t even keep up with the Slack DMs anymore. It’s endless.”

    Across the table, Moriyama closed his Teams window.
    “I just want one peaceful morning without all these pop-ups.”

    Sakakibara leaned back with a thoughtful look.
    “So much of what we send feels like reports for the sake of reporting.”

    Near the whiteboard, Squera — the team’s small AI companion — grabbed a marker.
    It drew three circles: Email, Chat, and Knowledge Sharing,
    and connected them with arrows.
    “They’re all important… but they’re tangled together, aren’t they?”

    Kamiya turned her chair and spoke calmly.
    “Then today, let’s start by thinking about how to reduce the noise.”


    Drowning in information

    The team gathered around the whiteboard as Kamiya drew a simple matrix.

    AreaCurrent stateToolsIssues
    EmailToo many repliesOutlook / GmailOverlaps, unclear priorities
    ChatToo many notificationsTeams / SlackInfo gets buried, no traceability
    MeetingsRepeated communicationTeamsMinutes not shared
    KnowledgeScattered informationNotionHard to find, no learning retention

    Sakakibara nodded.
    “So we’re connected — but everything’s fragmented.”
    Kamiya replied, “Exactly. The first step in DX isn’t adoption, it’s organization. The way we use tools shapes our culture.”


    Setting the hypothesis

    Shiraishi raised her hand.
    “What if we let AI handle the first draft of replies? ChatGPT could do that.”

    Hayakawa looked up from her Teams window.
    “And if Teams summaries could go straight into Notion, that would save hours.”

    Mizuno frowned slightly.
    “Gmail’s smart replies are fast, but they sound too stiff.”

    Moriyama chuckled.
    “If AI could understand who we’re writing to, that would be perfect.”

    Kamiya smiled and wrote on the board:

    Hypothesis: 60% of email and chat responses can be drafted by AI, while humans refine the remaining 40%.

    Squera tilted its head and added,
    “Then let’s build a process where AI and humans work together.”


    Afternoon experiments

    That afternoon, the team began testing their ideas.

    Shiraishi connected Outlook with ChatGPT.
    The AI-generated drafts were smooth and polite — almost too friendly.
    “It’s about 60% usable,” she mused. “But that last 40%? That’s where the human voice lives.”

    Mizuno tried Gmail’s Smart Reply.
    Instant suggestions appeared, but lacked emotion.
    “Efficient, yes. But a little cold. It needs a touch of empathy to sound real.”

    Hayakawa tested Teams’ AI summary tool.
    The meeting notes appeared automatically.
    “Half the time, half the effort. This could really change how we work.”

    Sakakibara organized Slack threads into Notion.
    ChatGPT scanned past conversations and built a FAQ page.
    “Look — our everyday chatter just turned into knowledge.”

    Squera projected a visual map onto the central monitor:
    emails flowing from Outlook and Gmail, through Teams and Slack,
    and into Notion as shared knowledge.

    Sakakibara smiled.
    “We’re starting to connect the dots.”
    Kamiya nodded.
    “DX isn’t about systems — it’s about reclaiming the time to think.”


    Evening reflections

    As the sun set, orange light filled the meeting room.
    On the whiteboard, Squera had drawn a large arrow:
    Reduce → Organize → Connect → Create

    Shiraishi laughed softly.
    “The more AI handles, the more human our work feels.”

    Kamiya smiled back.
    “Exactly. AI doesn’t steal our thinking — it gives us time to use it.”

    Squera looked up, marker in hand, and wrote beneath the arrow:

    “The beginning of humans and AI working side by side.”


    Next episode

    The following week, the SCW team began real-world testing of their tools:
    Outlook, Gmail, Teams, Slack, Notion — and ChatGPT at the center of it all.

    The results will be revealed in
    Episode 5 – Technical Edition: “When AI Changes How We Work.”

    Posted in Story | Tagged , | Leave a comment

    Episode 4: Three Teams in Motion — Small Steps Toward DX

    Morning light streamed through the wide office windows, spilling across the meeting room.
    The whiteboard was covered with sticky notes from their previous session — the ones where everyone had mapped out their daily work in detail.
    A faint draft from the air conditioning made a few notes flutter gently.
    On the table, laptops, printouts, and half-finished cups of coffee spoke of quiet focus and anticipation.
    Everyone had arrived a little early. Today was the day they would take their first real step forward.

    Kamiya: “I’ve refined the list we created last time. Some areas overlapped, so I reorganized them into sections that align better with how we actually work.”

    A new chart appeared on the wall monitor — nine areas of work, now grouped into three broader categories.
    It was the foundation for how Seaside Cloudworks would begin its DX journey.


    Three Teams, One Direction

    Sakakibara: “I see. So this means each team will identify problems in their own area and start experimenting, right?”
    Kamiya: “Exactly. There’s no rigid framework. Each team can start where they are, testing and improving what makes sense in their day-to-day work.”

    The sound of shuffling papers filled the room.
    Squera stood on the floor beside the whiteboard, cheerfully rearranging sticky notes to match the new categories.

    Shiraishi: “So how are we dividing the teams?”
    Kamiya: “I’ve drafted an initial plan. But I’d like each team to choose its own name.”


    Team Formation

    Kamiya drew three large rectangles on the whiteboard.

    Kamiya: “First, the Customer Connection DX Team. You’ll handle communication with clients and partners.
    That’ll be Shiraishi, Moriyama, Mizuno, and Sakakibara — with Squera joining as support.”

    Mizuno: “So we’ll be the team that connects with the outside world. I’ve got a few ideas I want to try!”
    Sakakibara: “Perfect. Let’s also think about how to use data more effectively.”

    Grinning, Squera added a note in the corner of the board:

    “Customer Connection = The Power to Connect.”

    Kamiya: “Next, the Creation & Development DX Team. Ayase and Honda — you’ll lead the charge on design, documentation, and automation.
    Ayase, please help support Honda as she gets up to speed.”

    Ayase: “Got it! I’ve been wanting to try AI-assisted tools anyway.”
    Honda: “I’ll do my best!”

    Behind them, Squera gave a little thumbs-up, clearly approving of the energy.

    Kamiya: “And finally, the Operations DX Team. Hayakawa and I will focus on administrative workflows — finance, HR, and information management.
    Squera, we’ll need your help with organizing the data.”

    Hayakawa: “Understood. Maybe we can start by streamlining expense approvals.”
    Kamiya: “Yes, and we can look into redesigning the request forms while we’re at it.”


    The First Steps Forward

    As discussions began, the atmosphere in the room shifted — a blend of concentration and excitement.
    Sticky notes started multiplying on the walls again, this time grouped by project and priority.

    Moriyama: “Looking at all this, it’s clear — every part of our work connects to one of these teams.”
    Kamiya: “Exactly. It doesn’t matter where we start, as long as we start. What’s important is taking that first small step.”

    Squera: “Then let’s get started!”

    Laughter filled the room, lightening the focused energy that had gathered there.
    For the first time, the team wasn’t just talking about change — they were doing it.


    🗂️ Reference: Team Assignments

    TeamMembersMain AreasExample Initiatives
    Customer Connection DX TeamShiraishi, Moriyama, Mizuno, SakakibaraCommunication, Meetings, Customer SupportImproving email and chat workflows, streamlining meetings, enhancing client interaction
    Creation & Development DX TeamAyase, HondaDocumentation, Development, PlanningAutomating report creation, using AI tools for design and content, reviewing workflow templates
    Operations DX TeamKamiya, HayakawaInternal Processes, HR, SecurityExpense and approval automation, HR digitization, updating security policies

    By the time the meeting wrapped up, the whiteboard was filled once again —
    not with problems, but with plans.

    At the very center, in bold letters, someone had written:

    “Start small, grow big.”

    And with that, Seaside Cloudworks’ DX story entered its next chapter.

    Posted in Story | Tagged , | Leave a comment

    Episode 3: “Structuring Our Work — A Two-Layer Inventory”

    In the previous meeting, the team created a “Daily Work Inventory” and filled the whiteboard with every task they could think of.
    Email handling, meetings, document preparation, customer support… It was a great start, but the categories were still rough and not yet systematic.

    On the day of the next meeting, morning light streamed into the conference room. Laptops and notebooks reflected the glow on the large table. Kamiya stood at the whiteboard, ready to refine what they had begun.

    Kamiya: “Last time, we listed our daily work. Today, I’ve reorganized it a bit. I adjusted the wording and structure to make the categories easier to use for our DX discussions.”

    She wrote down the revised top-level categories on the board:

    1. Communication
    2. Meetings
    3. Document Creation
    4. Planning & Research
    5. Development & Technical Work
    6. Operations & Maintenance
    7. Sales & Marketing
    8. HR, General Affairs & Administration
    9. Education & Training
    10. Information Security

    Kamiya: “Previously, we just wrote down things like ‘email’ or ‘meetings.’ Now I’ve separated customer support into communication or sales, and added information security as its own category. Do we all agree on this structure?”

    Everyone nodded. “This is clearer,” someone said. The framework was set, and the team was ready for the next step.


    Kamiya: “Now, let’s assign responsibility for each area so we can build a two-layer structure.”

    She pointed to each category in turn:

    • Shiraishi → Communication
    • Moriyama → Meetings
    • Ayase → Document Creation
    • Honda → Development & Technical Work
    • Kamiya added: “Honda is still learning, so Ayase, please support him.”
    • Mizuno → Sales & Marketing (well-suited, since she often works outside)
    • Sakakibara → Operations & Maintenance
    • Hayakawa → HR, General Affairs & Administration
    • Sakakibara & Mizuno → Planning & Research (a core area that needs both perspectives)
    • Ayase & Honda → Education & Training (Ayase as trainer, Honda as trainee)
    • Shiraishi → Information Security (technically complex, requiring his expertise)

    Assignments were set. Each member would take their category home as “homework,” refine it into detailed tasks, and bring it back for the next session.


    A few days later, the group reconvened in the conference room. Papers, sticky notes, and laptops were spread across the table as each member presented their findings. Kamiya wrote on the whiteboard as the categories expanded into two layers of detail.

    Moriyama: “Meetings take up more than we thought—regulars, project updates, client sessions… sometimes the same topic repeats.”
    Mizuno: “Sales looks very different when split into in-person visits and online outreach.”
    Sakakibara: “Planning and research are investments in the future. Making them explicit is important in itself.”
    Ayase: “Honda, the notes we organized together are looking good.”
    Honda: “Thanks! Breaking them down like this makes it clearer where the problems are.”

    The squeak of the marker echoed in the room as tasks filled the board, transforming into a map of the team’s work.

    Shiraishi: “Now it’s obvious where DX can make a difference. We can see overlaps and inefficiencies right here.”
    Kamiya: “Exactly. This map shows our whole landscape. The next step is deciding what to improve first.”

    Confidence began to replace uncertainty as the team looked at the completed board.


    Reference: Two-Layer Work Inventory (with Assignments)

    CategorySubtasksAssigned
    CommunicationChecking and replying to emails
    Phone calls (clients, partners, internal)
    Chat (Slack, Teams, etc.)
    Internal updates and reports
    Customer support (Q&A, tech support)
    Shiraishi
    MeetingsRegular meetings (weekly, monthly)
    Project progress updates
    Planning and strategy meetings
    Technical reviews
    Client discussions (requirements, etc.)
    Moriyama
    Document CreationProposals, estimates, reports
    Meeting materials
    Specifications and design docs
    Manuals and procedures
    Meeting minutes
    Ayase
    Planning & ResearchNew service planning
    Market and competitor research
    Technical research and selection
    User research and feedback analysis
    Sakakibara, Mizuno
    Development & Technical WorkSystem and service design & development
    Coding and unit tests
    Code reviews
    Bug fixes and incident response
    CI/CD operations and improvements
    Honda (with Ayase’s support)
    Operations & MaintenanceSystem monitoring and log checks
    Incident response and recovery
    Account management and configuration
    Regular maintenance
    Document updates
    Sakakibara
    Sales & MarketingClient engagement (hearings, proposals)
    Estimates and contracts
    Sales activity (emails, visits)
    PR and promotions
    Content marketing
    Mizuno
    HR, General Affairs & AdministrationAttendance and requests
    Expense and budget management
    Recruitment and interviews
    Internal systems and improvements
    Events and training
    Hayakawa
    Education & TrainingInternal study sessions
    Technical training and OJT
    Knowledge sharing (Wiki, Notion)
    Mentoring and onboarding
    Ayase, Honda
    Information SecurityReviewing access rights
    Incident drills
    Policy updates
    Monitoring for data leaks
    Shiraishi

    Posted in Story | Tagged , | Leave a comment